


Introduction
On my last post I’ve explained my experiences with Rust and why it is a nice fit for people working with both lower level system’s programming (such as a data distribution system) and higher level applications (a simple CRUD application). This post we will set up a development environment to get ready to write some code. Over the next posts I’ll be focusing on the language from the ground up. The posts will be smaller and focus on small topics. Hope you enjoy it!
Installing Rust
Rust has a great tooling ecosystem. Installing is easy thanks to tools developed by the community that are the recommended way of installing and managing the compiler and its tools .
Rustup
To begin, let’s install the main tool for managing compiler and tooling versions. Rustup is a project that handles that for us, and also provides commands to update the compiler version, changing the compiler version globally or in a per project basis.
The project is multi platform, which is nice. The installation instructions are trivial and can be found here: https://rustup.rs/
This should install the compiler and the Cargo package manager.
Cargo
Cargo is the Maven/NPM equivalent for the Rust language. It can create new projects, compile them, run tests, generate documentations, retrieve dependencies and install some tools. You can use it through your platform’s CLI interface. Just run cargo — help and take a look at all it can do!
Creating a New Project
To create a new project navigate using your CLI to the folder where you want to store it and run cargo new project-name, this will create a new folder with the basic structure of an executable project. Let’s see the basic structure:
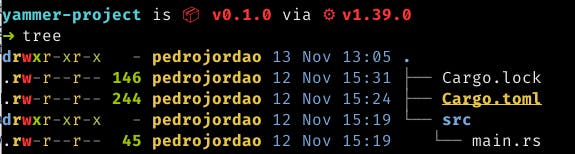
Rust uses a strongly defined project structure. All source code must be in a folder called src. The entry point of an executable application must be in a file called main.rs, which must contain a main function. Cargo projects also must have a file called Cargo.toml at the root of the project, containing such information as the name of the project, author, Rust version and dependencies. This can be seen in this newly generated project:

Finally, the default generated project is the famous Hello World. Let’s take a look at the main.rs Cargo created for us
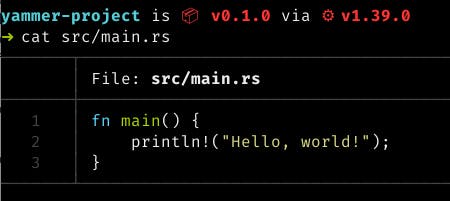
Looks nice, right?!
Compiling and Running
Running and compiling with Cargo is also a piece of cake. Inside your new project folder just run cargo build. This will compile the project and all its dependencies. Yes, you read that right. All its dependencies. Currently Rust does not provide dynamically linkage between libraries. Everything is always statically linked (well, kinda sorta, might talk about that in the future). This means that from a clean project you will always have to compile the project and it’s dependencies. Which can be a pain depending on the size of the project. Luckily Cargo does provide caching, so after the initial compilation your dependencies won’t be recompiled unless you change versions or compilation mode. Also, dependencies are compiled in parallel to make things a little better.
Before we get too sidetracked, let’s see the output of cargo build:

As you can see, the compilation was pretty quick. The cargo build command will build the project in debug mode, which is faster, but generates less optimized code. For a release build we should call cargo build — release:

This nice output informs us that the new build is in release mode, which is optimized.
Compilation generates many new files in your project structure under the target/folder. This is where compiled objects are stored and cached. For this simple project we already get many new files:
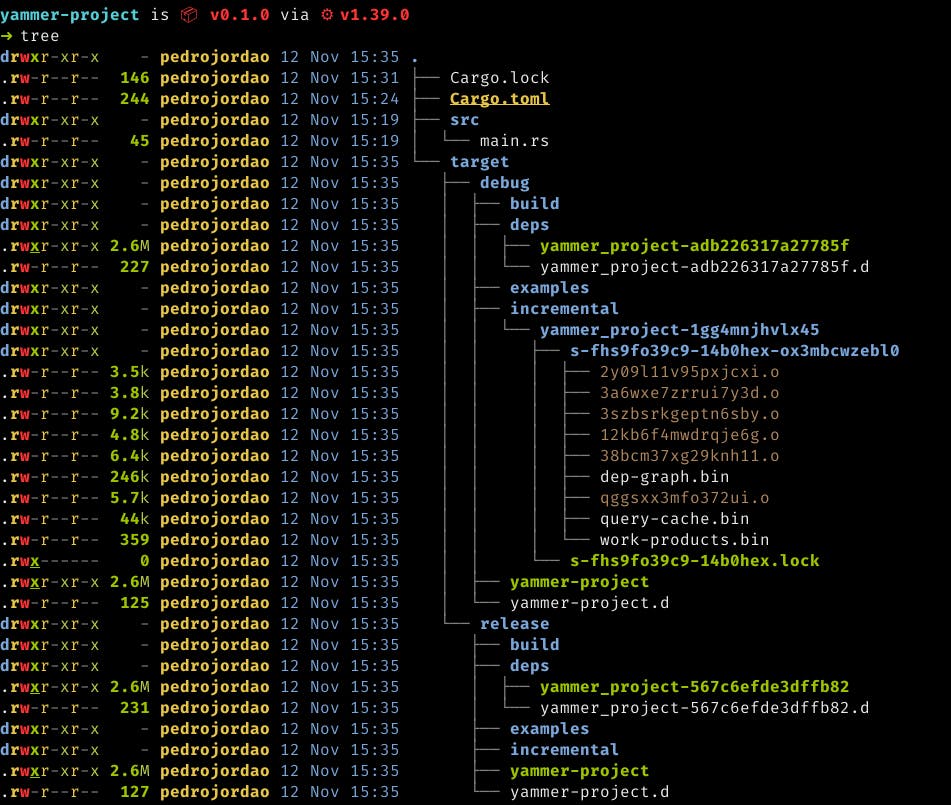
Under the target/ folder we can find two new folders, debug/, where the unoptimzed version of the compiled code is stored and release/, where the optimized version is stored. To execute your new application you can go inside this folders and run the executable directly or execute cargo run (or cargo run — release for the release version). This will execute the project from the root folder of the project. You can also send application parameters through this option if your application needs it. Using cargo run has the benefit that if any changes happened in your code it will also compile the code before executing.

Finally, another common pattern around using Cargo is using cargo check to verify your code instead of running a full build. Cargo check will verify your code for compilation errors but will not generate any object code. As your project grows in size, compilation times grow with it, so using cargo check is the best way of speeding up your development cycle…
Well, that is unless you want to use an IDE!
IDE support
Currently there are no IDEs that fully support the Rust language, but there are some great plugins. JetBrains’ tools have the https://intellij-rust.github.io/ plugin, which provides code completion, error reporting, macro expansion and fix suggestions. If you have access to Clion you even get debugger support! In my experience this is the best user experience of all the IDEs.
Another option is to use RLS, the Rust Language Server, which is an implementation of the https://langserver.org/ for the Rust language. If your IDE or editor support the Language Server Protocol you can use this option. There are some great plugins for editors such as emacs, vim and Microsoft’s Code which works pretty well. With some hacking with LLDB you can even get debugging support, though it’s not as nice as in Clion.
Conclusion
Well, that’s it for today. On the next post we’ll see some actual code (finally!) and learn how to write functions, the power of statements in Rust and how to declare variables.
See you soon!